Git on a personal private project
When your project is not mature enough, or not interesting enough to share, you can use Git just locally.
Before you create your first project
git config --global user.name "FirstName LASTNAME"
git config --global user.email ...@...
git config --global core.editor emacsclient
Creating a "repository"
- A "repository" is managed by Git and contains all the history of your project.
- Go to a dedicated directory for the source files of your project.
git init
.git.
git add <pathspec>...
git add .
git commit -m "Begin version control"
An important concept: staging
As you would expect, you may have files in your directory that are:
- "Untracked": you have not added them to the repository (with
git add), so Git does not care about them. - "Unmodified": they are tracked by Git (you have added them at some point), and you have not modified them since your last commit.
- "Modified": since your last commit.
But also, less obvious, files can be "staged". When you commit, Git
does not include in the commit the current state of your directory,
with its modifications. Instead, it includes the staged files. That
is, you have to explicitly tell Git which files you want to include in
the next commit. We also say that Git puts the files into the "staging
area". The command to stage a file is git add. That is the
same command we used to track untracked files: the newly tracked files
are directly put into the staging area.
So there is this additional intermediate step, staging, between modifying files and committing. Git remembers the state of a file you stage at that moment. If you modify a file after staging it, the committed file will be the file as it was when you staged it.
 (from the Git
book)
(from the Git
book)
"Good commits"
Two pieces of advice: make "atomic commits" and take care of the commit message.
Atomic commits are commits that do only one thing, correspond to
only one idea, one motivation. Also, do not mix format and
functional changes. For example, if you need to rename a bunch of
files (or move them to another directory, or change their suffix), do
only this in one commit, do not at the same time modify their
content. If you need to make cosmetic change to a file: add or remove
space, or modify comments, do only this in one commit, do not mix it
with modification of the algorithm or computations. If you need to
rename a variable (or a bunch of variables with the same pattern of
change), do only this. A commit should be focused enough so that you
can describe what it does in one line, and the modifications should be
understandable when looking at the output of git diff (one of the
basic commands). See atomic commit
convention.
Take advantage of the staging step to make atomic commits: stage only
some of your modified files, or even part of your modifications in a
given file (with git gui for example, see
below).
The commit message should start with a one-line summary of what the commit does, less than 50 characters long. It should be in the imperative mood, start with a capital letter, but not end with a period. After the first line, there must be a blank line. Then there can be paragraphs giving details, motivation, explaining choices made etc. This formatting of the commit message is not a requirement of Git but it is expected by the ecosystem of Git-revolving software. See How to Write a Git Commit Message.
Other basic commands and tools
git status will tell you what files are untracked, modified,
staged. git diff will show the modifications on tracked files, git
log will show you the history of your repository.
When you run git log, you can see a strange sequence of characters
next to each commit. This sequence of characters is the checksum that
identifies the commit: it is computed from the content of the commit,
that is the content of all the files in that snapshot of your
history. (This may be a little disconcerting if you come from other VCS
such as Subversion: in Git, a commit is not identified by a simple
revision number that increments at each commit.)
There are many options of git log that filter or tailor the display
of the history but it is easier to use gitk. gitk is a tool that is
distributed with Git: it is the Git repository browser.
Another useful tool distributed with Git is git gui: a portable
graphical interface to Git. git gui is useful to prepare atomic
commits. If your text editor is
Emacs,
the Magit package is very good, you can use it
instead of git gui. If you use Neovim, you can
integrate Lazygit into
Neovim.
Branches
The idea of branching when working with computer code:
-
Working in parallel on different ideas.
-
Or when you want to try a new idea, but you are not sure it is a good idea. Or maybe working on it temporarily breaks your code. In the meantime, you want to have a working version of your code, for "production".
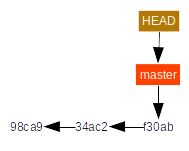
In Git, a branch is a pointer to a commit (there is no copying of files involved). So a branch is very cheap to create. When you create a repository and your first commit, Git automatically creates for you a branch called master.
Git is able to navigate the history of commits because each commit has a pointer to its "parent" commit: the commit that came directly before.
Git uses another pointer, called HEAD, which points to a branch. The "current branch" is the branch that HEAD points to. When you create a commit, the current branch changes its target: from the parent commit to the new commit. In other words, every time you commit, the current branch pointer moves forward automatically.
The basic commands to work with branches are:
git branchto create a branchgit checkoutto change the current branch and modify your working directory accordingly
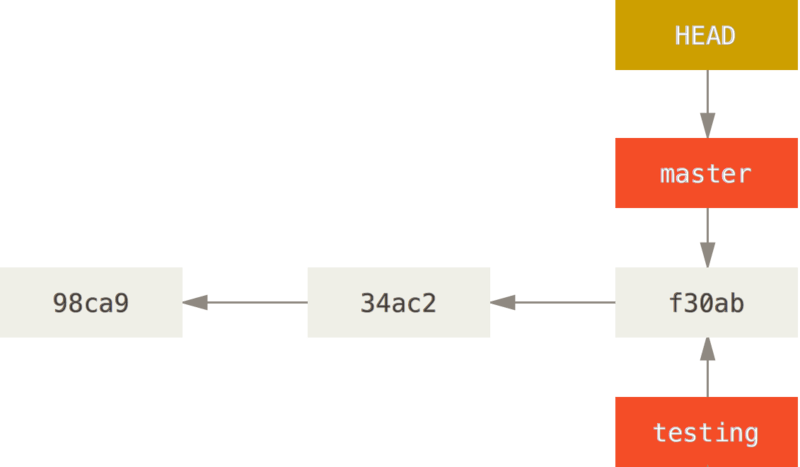
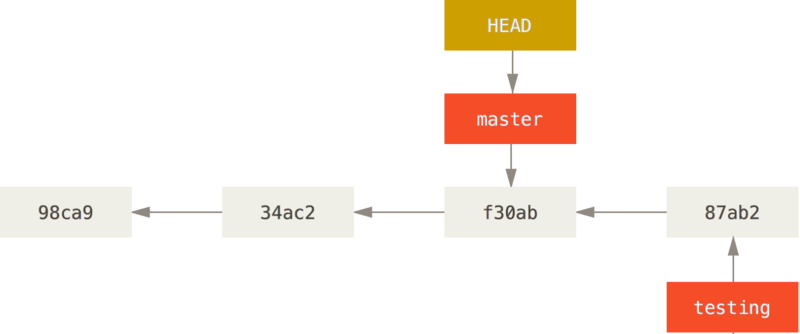
We illustrate the branch concept and commands with the following figures from the Git book. We create a branch called testing:
git branch testing
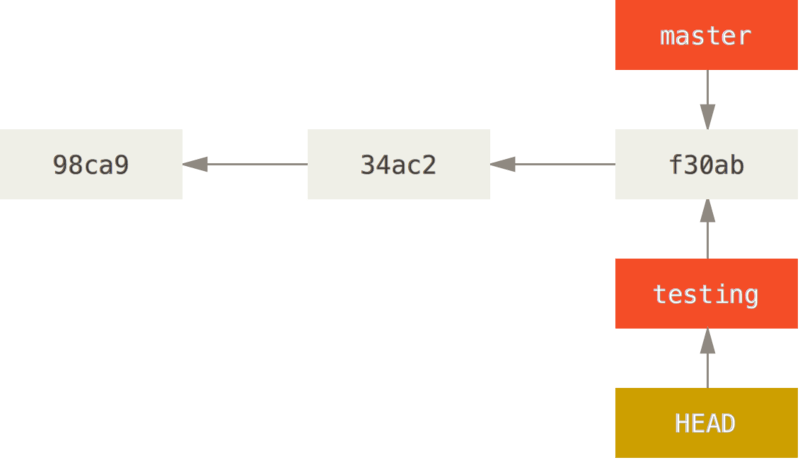
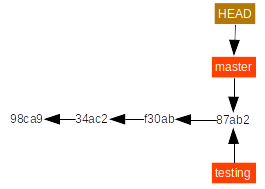
We make "testing" the current branch, instead of master:
git checkout testing
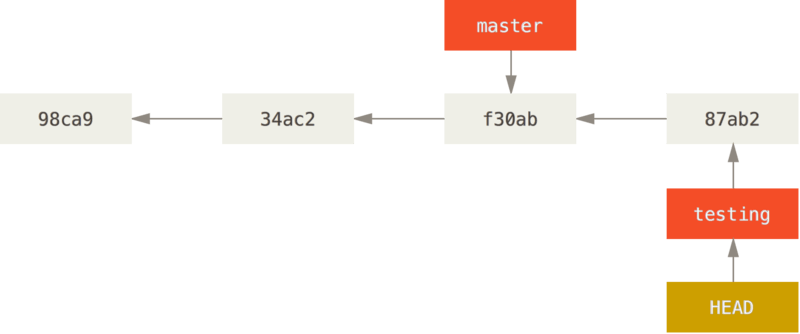
We create a commit (not showing the commands, you know about them already):
We make "master" the current branch again:
git checkout master
Note that the above command also changes the content of the working directory.
Suppose we decide that what we did in the testing branch is good and we want it in the master branch. Then we run:
git merge testing
to bring master up to date with testing (this also changes the working directory). The command above creates a "fast-forward merge": it just moves master, but does not create a new commit. This is possible because master was the ancestor of testing when the merge was run.
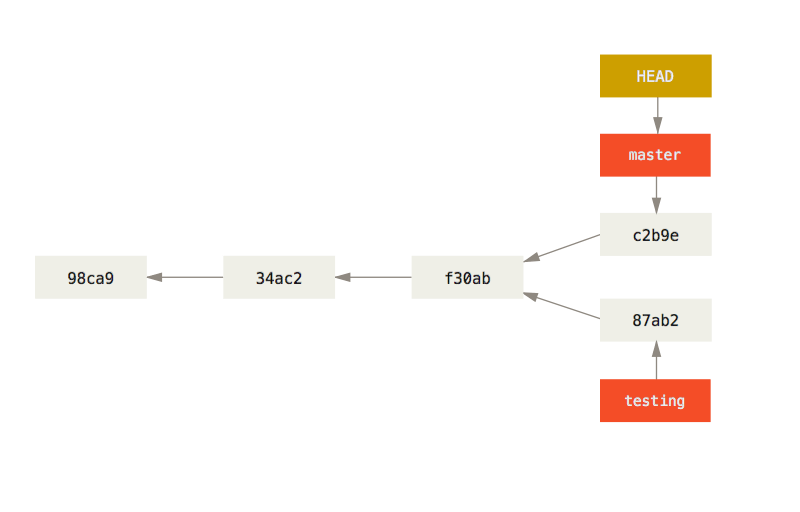
Now let us consider an alternative scenario and go back to this situation:
Suppose now that, instead of merging the branch "testing" right now, we create a commit. Therefore we get divergent history:
We can then merge the two branches with the command git merge but it
will not be a fast-forward merge: Git will have to create a new commit
containing the merged state. When Git has to create a merge commit
from divergent history, it tries to do it automatically: it takes
modified files from each branch and, if a file is modified in both
branches, it takes modified lines from each branch. But it may happen
that the same line has been modified in different ways in the two
branches. Then, of course, Git cannot decide which modification is the
good one, so it will not create the merge commit and it will tell you
that there is a conflict. You must then look at the conflict and
decide what you want to put into the merged commit at this
position. See Basic Branching and
Merging.
Rewriting history
There are useful commands in Git to rewrite history: correcting a commit message, splitting commits or moving commits around. The simplest of these commands is:
git commit --amend
which modifies the last commit you made. But you may completely
abandon commits with git reset and reorganize them with git rebase
-i. See Git Basics - Undoing
Things,
Git Tools - Rewriting
History
and Git Tools - Reset
Demystified.